Posts filed under ‘Chipper Snacks’
Thanks a Latke! History and Recipe
So steeped in tradition, the latke is open to interpretation. We created a Chipper favorite to celebrate two great family holidays landing on the same day this year Thanksgiving and Chanukah! Share the story with your children and weave in your own history; the opportunity to celebrate who we are, while acknowledging others, helps children develop an appreciation and respect for the world in which they live.
In America we enjoy many things: the ability to celebrate and choose our own religion, where we live, what we do in life, and the friends we keep. It seem obvious to our children today – and they even receive more freedom than the generation before them. But do kids today realize this?

Thanks a Latke Recipe
What you need:

- Frying pan
- Vegetable oil
- Potatoes (russets to sweet)
- Egg
- Salt and Pepper
- Sour Cream
- Apple sauce and cranberries
- Roasted turkey breast sliced
- Gravy
*If you’ve made your mashed potatoes, have a half cup ready!
 How to cook it: *Latkes can be made in advance and then baked to heat before serving.
- Two pounds russet potatoes
- Egg
 Directions:
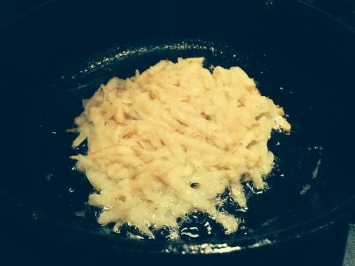
- Shred potatoes.
- Beat an egg in a large bowl.
- Pour in potatoes and coat. *Add in the mashed potatoes if you like as it yields a fluffy to crispy latke
- Pour about ¼ inch oil into frying pan and heat to medium high.
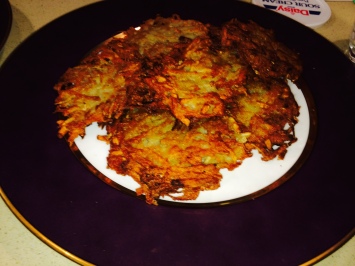
- Fry the latkes for 2-3 minutes on each side until they turn golden brown. Test the first latke and make sure it’s cooked all the way through; if the latkes are browning faster than they’re cooking, reduce skillet heat.
- Place on paper towel and pat.
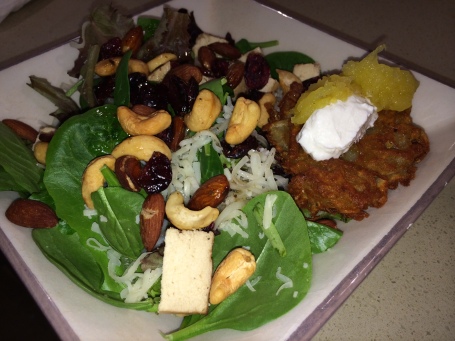
- Place one to three latkes on a plate then layer the turkey breast.
- Dot each latke with sour cream, applesauce and cranberries then drizzle the gravy over them.
*Makes 12-16 medium latkes.
Enjoy and have a Chipper Thanksgiving!
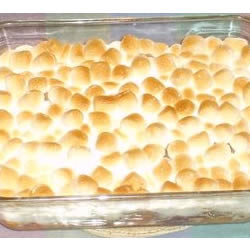
Chipper Recipes: Thanksgiving Sweet Potatoes and their benefits!
“This sweet potatoes recipe is made even sweeter with orange juice, cinnamon, marshmallows and a pinch of LOVE.”
Thanksgiving is only 3 days away! Still trying to figure out what dish you’ll bring to the table? Try a classic and easy Sweet Potato and Marshmallow recipe that tastes great and is good for you! Sweet Potatoes are a great winter veggie filled with important nutrients (see image below.)
Even with some sweet marshmallows, this dish is healthy and filling! Marshmallows sometimes get a bad wrap but they really aren’t that bad for you, especially if you try some organic ones! Learn more about marshmallows rise to f(l)ame in this infographic!
Ingredients
- 2 (15 ounce) cans sweet potatoes or cook and mash your own: One 15-ounce can of sweet potatoes equals one cup fresh!
- 1/4 cup orange juice
- 3/4 cup all-purpose flour
- 1/2 cup brown cane sugar
- 1 teaspoon ground cinnamon
- 1 pinch salt
- 1/2 cup butter
- 1 1/2 cups miniature marshmallows (try organic!)

Directions
- Preheat oven to 350˚F.
- Place sweet potatoes in a 10×6 inch shallow baking dish and pour orange juice over.
- In a small bowl, combine flour, sugar, cinnamon and salt; mix together and cut in margarine. Sprinkle over sweet potatoes.
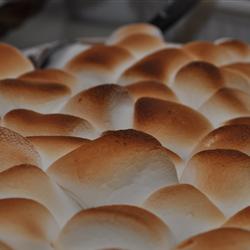
- Bake for 30 minutes. Remove from oven, sprinkle with marshmallows and broil until browned.
 What’s your favorite Thanksgiving Recipe? Let Chipper know and have a Chipper Thanksgiving!
Chipper Snacks: Winter Veggies + Sweet Potato Casserole Recipe + Spiced Pecans
Make magic in the kitchen this holiday season! Eat seasonally and try adding these winter vegetables into your next meal! Look for these winter vegetables at farmers markets (if you’re lucky enough to have year-round markets near you) and in produce departments for the best flavor and greatest value in season. Specific crops and harvest dates will depend on your region’s climate and most of these are only available locally in temperate regions. Find details for your area with Regional Seasonality Guides and State-Specific Guides.
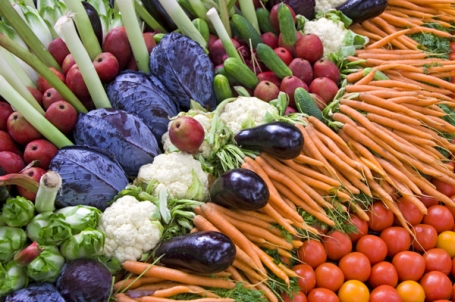
- Beets are in season in temperate climates fall through spring, and available from storage most of the year everywhere else. Fresh beets are often sold with their greens still attached.
- Belgian Endive are mostly “forced” to grow in artificial conditions, and are thus available year-round. Their traditional season (when grown in fields and covered with sand to keep out the light), like that of all chicories, is late fall and winter.
- Broccoli, like many cruciferous vegetables, can be grown year-round in temperate climates so we’ve forgotten it even has a season. But, like the rest of its family, it tastes best (that is, more sweet, less bitter and sharp) when harvested in the cooler temperatures of fall in most climates.
- Broccoli raabe, rapini is a more bitter, leafier vegetable than its cousin, broccoli, but likes similar cool growing conditions.
- Brussels sprouts grow on a stalk, and if you see them for sale that way snap them up – they’ll last quite a bit longer than once they’re cut.
- Cabbage is bright and crisp when raw and mellows and sweetens the longer it’s cooked. The cooler the weather in grows in, the sweeter it tends to taste (this effect is called “frost kissed”).
- Cardoons taste a lot like artichokes; look for firm, heavy-feeling specimens.
- Carrots are available from winter storage from local growers in many areas, and fresh in warmer and temperate regions.
- Cauliflower may be grown, harvested, and sold year-round, but it is by nature a cool weather crop and at its best in fall and winter and into early spring.
- Celeriac/celery root is at its best in the cooler months of fall, winter, and early spring (except in cold climates, where you’ll find it during the summer and early fall).
- Celery is at its best in the fall, with its harvest continuing through winter in warm and temperate climates.
- Chicories are cool weather crops that come into season in late fall (and last in temperate climates through early spring).
- Curly Endive (Frisée) is a chicory at its best in fall and winter.
- Escarole is another bitter chicory in season fall and winter.
- Fennel‘s natural season is from fall through early spring. Like most cool weather crops, the plant bolts and turns bitter in warmer weather.
- Herbs (from hothouses in cooler climates)
- Horseradish is at its best in fall and winter. Like so many other root vegetables, however, it stores well and is often available in decent shape well into spring.
- Jerusalem artichokes/sunchokes are brown nubs, that look a bit like small pieces of fresh ginger. Look for firm tubers with smooth, tan skins in fall and winter.
- Kale is like all hearty cooking greens – cooler weather keeps it sweet.
- Kohlrabi (late fall) comes into season by the end of fall, but stays at its sweet best into winter.
- Leeks more than about 1 1/2 inches wide tend to have tough inner cores. The top green leaves should look fresh – avoid leeks with wilted tops.
- Onions (storage)
- Parsnips look like white carrots and have a great nutty flavor. Look for thinner parsnips, since fatter ones tend to have a thick, woody core you need to cut out.
- Potatoes (storage)
- Radicchio, like all chicories, radicchio is more sweet and less bitter when the weather is cool.
- Radishes (large varieties)
- Rutabagas also known as “yellow turnips” and “Swedes” are a sweet, nutty root vegetables perfect in stews, roasted, or mashed with plenty of butter.
- Shallots from storage bring a sweet and delicate onion-slash-garlic flavor to winter cooking.
- Sweet potatoes are often sold as “yams.” They store very well and so are available from local sources year-round in warmer areas and otherwise from late summer through winter.
- Treviso (radicchio)
- Turnips have a bad rap they don’t deserve. Fresh turnips have a sharp but bright and sweet flavor. Look for turnips that feel heavy for their size.
- Winter squash of all sorts comes into season in early fall and usually last well into winter.
SWEET POTATO CASSEROLE

Looking for the perfect Thanksgiving dish? Try making this seasonally sound Sweet Potato Casserole recipe with your little ones. Have them measure out the sugar and salt, beat the eggs, and/or mash your potatoes. Small accomplishments not only build confidence, they encourage your child to help out. Learn more about motivating little Helping Hands!
Ingredients:
- 4 Cups Sweet Potatoes, cooked and mashed
- 8 oz. Cream Cheese, softened
- 1/2 Cup Unsalted Butter, softened
- 2 Eggs, beaten
- 1/4 Cup Brown Sugar
- 2 1/2 Tbsp. Dry Sherry
- 1/4 Tsp. Salt
- 3/4 Cups Black Walnuts, chopped
- 1/2 Tsp. nutmeg, freshly grated if possible
How to:
- Pre-heat oven to 350˚F
- With electric mixer (NOT food processor), whip all ingredients together except for walnuts and nutmeg until light.
- Stir in walnuts and put into buttered casserole dish.
- Spread evenly and grate fresh nutmeg over the top.
- Bake for 45 min. until golden brown!
- ENJOY 🙂
SPICED PECANS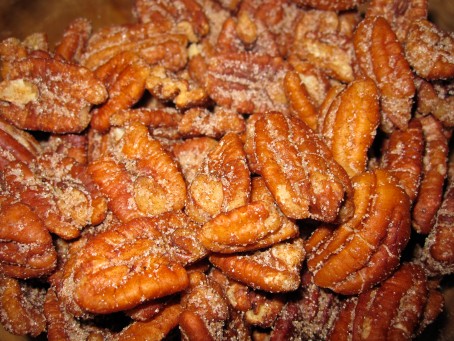
Roasted chestnuts, spiced pecans and nut crackers! Tis’ the season for some deliciously healthy nuts. Try this Spiced Pecan Recipe to perfect your next salad or put out as an appetizer for you Holiday party. You and your little one(s) won’t be able to each just one!
Ingredients:
- Spray Olive Oil
- 2 Cups Pecan Halves
- 1/4 Cup Brown Sugar, firmly packed
- 1/4 Cup melted Butter
- 4 Tsp. Mexican Hot Pepper Sauce (CHOLULA or any type you prefer)
- 1 Tsp. Salt
- 1/2 Tsp. Black Pepper
How to:
- Pre-heat oven to 350˚F
- Lightly spray olive oil on cookie sheet.
- Mix all other ingredients together and spread on pan in 1 layer.
- Bake 10 minutes until lightly toasted, stirring once.
- Cool and ENJOY! Makes 2 cups of yumminess.
What’s your favorite Thanksgiving Day recipe? Let Chipper know!
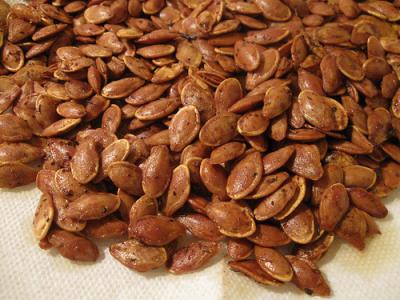
Chipper Snacks: Roasted Pumpkin Seeds Recipe

It’s time to get Chipper for Halloween and carve those pumpkins! There are lots of things to consider when carving your Jack-o-lantern: Should you carve a face or a scene? If a face, what kind of face? Scary? Funny? Share your Jack-o-lanterns photos with Chipper on Facebook for a chance to win a Chipper Plush Clippy!
Once you decide on what to carve, the next thing to consider is what to do with all the pumpkin insides? You can get creative and use if for your jack-o-lantern in some of the examples seen below. No matter what you choose to do, make sure to save those pumpkin seeds!


Pumpkin seeds are not only a tasty fall snack, they are packed with powerful nutrients and have an array of health benefits…like helping your kids fall asleep and providing a great source of fiber!
How To Roast Pumpkin Seeds:

1. Clean the seeds! The first and most difficult step in making your roasted pumpkin seeds is removing them from the stringy insides of your pumpkin. It’s easiest to try and do as much of this when you are first cleaning your pumpkin out. have one big bowl for the guts and another for the seeds. After picking off the strands, give them a GOOD rinse with water in a colander.

2. Boil for 10 minutes in salt water. Add the pumpkin seeds to a medium-sized pot of water along with 1 tsp salt. Bring it to a boil and reduce the heat to simmer, uncovered, for about 10 minutes over low-medium heat. This method helps make the pumpkin seeds easier to digest and produces a crispy outer shell during roasting.

3. Drain the seeds in a colander and dry lightly with a paper towel or tea towel. The seeds will stick to the towel, but just rub them off with your fingers. Don’t worry, they don’t have to be bone dry – just a light pat down.
4. Spread seeds onto a baking sheet and drizzle with extra virgin olive oil (use about 1/2-1 tsp depending on how many seeds you have). Massage oil into seeds and add a generous sprinkle of vegetable salt or fine grain sea salt will do. Try to spread out the seeds as thin as possible with minor overlapping.

5. Roast seeds at 325˚F for 10 minutes. REMEMBER: The inner seeds cook much faster than the outer shell! they are easy to burn so keep a close eye. Remove from oven and stir. Roast for another 8-10 minutes (if your oven temp is off, this could vary a lot!). During the last 5 minutes of roasting, remove a few seeds and crack open to make sure the inner seeds are not burning (you don’t want the inner seed brown). Cool a couple and pop them into your mouth to test. They are ready when the shell is super crispy and easy to bite through. The inner seed should have only a hint of golden tinge to it. They should NOT be brown.
6. EAT and ENJOY! Remove from oven, add a bit more veggie salt to your own taste, and dig in! There is no need to remove the outer shell; it’s quite possibly the best part.

Pumpkin seeds make a healthy alternative to popcorn or candy, especially during the sweet-craze of Halloween! Be sure to pair it with Vitamin C to absorb the most iron you can.

Pack them in your little one(s) lunch using a plastic baggy or make a gift out them with cute miniature mason jars. Just be sure to share and enjoy!

Chipper Snacks: Healthy Halloween Recipes & Tips

Fall is officially here and Halloween is just around the corner! One of Chipper’s favorite Holidays, Halloween is all about dressing up and eating treats! What are you and your little one(s) going to be for Halloween? Let Chipper know on Facebook for a chance to win some fun prizes! Just LIKE, COMMENT, & SHARE to be in the running!
As a parent, it can be hard to avoid all the unhealthy candy given away at school or received Trick-or-Treating. As Chipper always says, “Healthy before sweet, can’t be beat!” So how can you get your kids to eat carrots instead of candy corns? Get creative and make some of these spooky treats your kids are sure to love!
Banana-Pillar
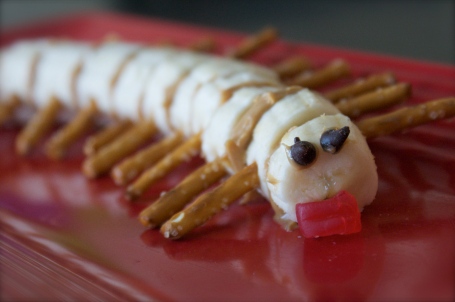
- 1 banana
- creamy peanut butter
- pretzel sticks
- 2 mini chocolate chips, 2 peppercorns, or 2 pieces of black olive
- A red fruit snack, a small piece of red apple or strawberry
Slice the banana into 1-2 inch pieces. Spread a layer of peanut butter between each slice of banana. Break the pretzel sticks in half and press into the sides of the banana slices. Place of dollop of peanut butter onto the chocolate chips and stick on the front for the eyes. Dip the fruit snack in peanut butter and place that on the front of the banana for the tongue.
Spooky spider eggs
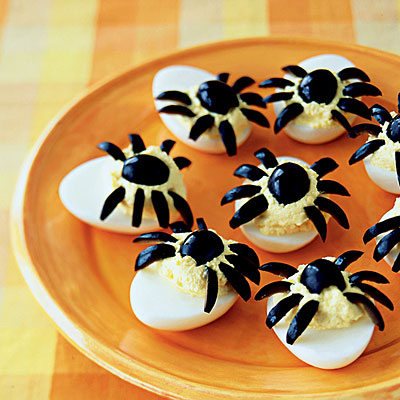
If deviling your eggs isn’t enough this Halloween, spider them too! First, devil your eggs. Then cut pitted black olives in half lengthwise. Place one half on top of an egg for the body, and cut the other half crosswise into thin slices to form the creepy legs. Presto, Deviled Spider Snack!

Vampire Bagel Bites

Sink your teeth into this well-clad Transylvanian bagel. We dare you to count the number of bites it takes before this spellbinding treat disappears.
- Spread cream cheese on a mini bagel half.
- Add triangle strips of red pepper for a colorful collar.
- Cut one Kalamata olive in half lengthwise, then slice one half lengthwise again. Use the two slivers as eyebrows. Slice the other half horizontally to make a triangle and use as the widow’s peak hairstyle.
- Use a shred of carrot as the nose and capers as the eyes.
- Decorate with thin slices of green onion for the mouth.
Ghost PB&J Sandwich

A simple but spooky ghost sandwich makes a lunchtime staple into a fun Halloween treat. For multiple hungry goblins use a variety of Halloween-theme cookie cutters such as pumpkins, witch hats, and cats to make a festive and tasty sandwich platter.
1. Make a peanut butter and jelly sandwich.
2. Use a ghost-shape cookie cutter to cut the sandwich into a ghost shape.
3. Press two raisins into bread — use peanut butter if necessary — for the ghost’s eyes.
Banana Ghosts and Orange Pumpkins

This is as healthy, cute and simple as you can get! Make the Banana ghosts with Bananas and Chocolate chips for the eyes and mouth. To make the pumpkins, remove the core from oranges or tangerines (cuties work great!) and chop small pieces of celery for the stems! Easy-peasy 🙂
Orange Jack-o-Laterns
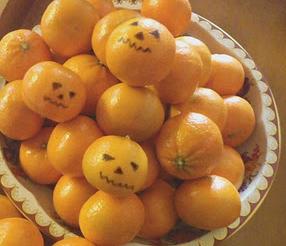
So simple, just sharpie on tangerine skins and you have a jack-o-lantern in no time. It helps to make sure you buy smooth skinned tangerines as rougher skinned oranges do not take the marker well. The ink on these dried completely and didn’t smear when peeled.
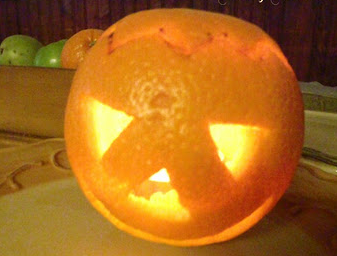
Making real orange jack-o-lanterns is so easy! Cut the top just as you would a real jack-o-lantern, remove the top, use a spoon to remove the orange pulp and finish by cutting out the face. The pulp can be made into healthy orange smoothies!
Roasted Pumpkin Seeds
Save all those pumpkin seeds from you Jack-o-lantern and use them for a yummy, healthy snack full of fiber! Find the BEST PUMPKIN SEED RECIPE HERE!
- 1 cup pumpkin seeds
- 1 tablespoon olive oil or vegetable oil
- 1/2 teaspoon sweet paprika (or smoked paprika would work nicely too)
- 1/2 teaspoon chili powder
- 1/2 teaspoon salt
-
Preheat oven to 350ºF.
-
On a foil-lined rimmed baking sheet, add pumpkin seeds. Try to remove as much pulp from the seeds as possible.
-
In a small bowl, combine oil, paprika, chili powder and salt. Stir to combine. Toss oil with pumpkin seeds, and coat evenly.
-
Bake until golden, about 15 minutes. Cool, and serve.
Pumpkin Platter

A cool twist to a classic veggie platter! Arrange your baby carrots in a pumpkin shape and use 3 small square or triangle dip dishes for the eyes and mouth, filled with ranch or your favorite sauce. Create the mouth with sliced cucumbers and add a large piece of broccoli for the stem.
What are some healthy, spooky snacks you like to make? Or what other Fall Recipes do you like to make? Let Chipper know and have a Happy and Healthy Halloween 🙂
Chipper Snacks: Fall Sweet Potato Fries Recipe

These sweet potato fries are a tasty Fall Recipe to try during the school year… especially if they’re crispy, coated in gluten-free panko, and an aromatic mix of parmesan, sage and garlic!
They’re so easy you can make them in minutes. Your kids, friends and family will adore you, and you can rest assured that you’ve given them a healthy snack or side dish. Find a list of health benefits gained from eating Sweet Potatoes below!
Ingredients:
(based on 2 potatoes)
- 1 sweet potato per person
- 1/2 cup of gluten-free panko
- 1/4 cup freshly grated parmesan
- 2 garlic cloves, finely chopped
- 4 or 5 leaves sage, finely chopped
- 1 Tablespoon olive oil
- Sea salt and pepper to taste
Directions:
- Preheat oven to 450˚F.
- Cut potatoes in half and then in 1/4-inch steak fry slices.
- Place in a large mixing bowl, add the oil and toss until all are well coated (add more if needed).
- Season with salt and pepper and toss.
- Mix together the panko, parmesan, sage and garlic and place on a plate or leave on the cutting board.
- Dip each fry into the mixture on both sides. Press the mixture down with your hands to help it stick.
- Place fries in a single layer on a baking sheet that’s been lightly coated with olive oil or place a sheet of parchment paper on the tray and then layer.
- Bake for about 20 minutes or until cooked through and crispy.
- Enjoy! 🙂
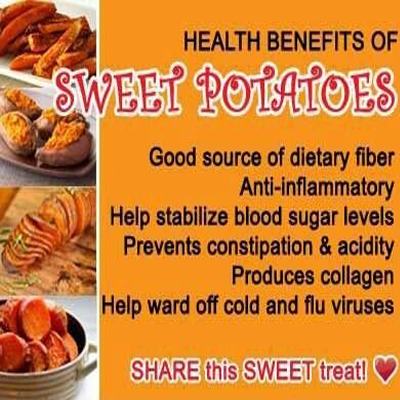
Not only are sweet potatoes readily available, inexpensive, and delicious, there are many other reasons to love these yummy vegetables. Here are 9:
1. They are high in vitamin B6. Vitamin B6 helps reduce the chemical homocysteine in our bodies. Homocysteine has been linked with degenerative diseases, including the prevention of heart attacks.
2. They are a good source of vitamin C. While most people know that vitamin C is important to help ward off cold and flu viruses, few people are aware that this crucial vitamin plays an important role in bone and tooth formation, digestion, and blood cell formation. It helps accelerate wound healing, produces collagen which helps maintain skin’s youthful elasticity, and is essential to helping us cope with stress. It even appears to help protect our body against toxins that may be linked to cancer.
3. They contain Vitamin D which is critical for immune system and overall health at this time of year. Both a vitamin and a hormone, vitamin D is primarily made in our bodies as a result of getting adequate sunlight. You may have heard about seasonal affective disorder (or SAD, as it is also called), which is linked to inadequate sunlight and therefore a vitamin D deficiency. Vitamin D plays an important role in our energy levels, moods, and helps to build healthy bones, heart, nerves, skin, and teeth, and it supports the thyroid gland.
4. Sweet potatoes contain iron. Most people are aware that we need the mineral iron to have adequate energy, but iron plays other important roles in our body, including red and white blood cell production, resistance to stress, proper immune functioning, and the metabolizing of protein, among other things.
5. Sweet potatoes are a good source of magnesium, which is the relaxation and anti-stress mineral. Magnesium is necessary for healthy artery, blood, bone, heart, muscle, and nerve function, yet experts estimate that approximately 80 percent of the population in North America may be deficient in this important mineral.
6. They are a source of potassium, one of the important electrolytes that help regulate heartbeat and nerve signals. Like the other electrolytes, potassium performs many essential functions, some of which include relaxing muscle contractions, reducing swelling, and protecting and controlling the activity of the kidneys.
7. Sweet potatoes are naturally sweet-tasting but their natural sugars are slowly released into the bloodstream, helping to ensure a balanced and regular source of energy, without the blood sugar spikes linked to fatigue and weight gain.
8. Their rich orange color indicates that they are high in carotenoids like beta carotene and other carotenoids, which is the precursor to vitamin A in your body. Carotenoids help strengthen our eyesight and boost our immunity to disease, they are powerful antioxidants that help ward off cancer and protect against the effects of aging. Studies at Harvard University of more than 124,000 people showed a 32 percent reduction in risk of lung cancer in people who consumed a variety of carotenoid-rich foods as part of their regular diet.2 Another study of women who had completed treatment for early stage breast cancer conducted by researchers at Women’s Healthy Eating and Living (WHEL) found that women with the highest blood concentrations of carotenoids had the least likelihood of cancer recurrence.
9. There are versatile. Try them roasted, puréed, steamed, baked, or grilled. You can add them to soups and stews, or grill and place on top of leafy greens for a delicious salad. I enjoy grilling them with onions and red peppers for amazing sandwich or wrap ingredients. Puree them and add to smoothies and baked goods.
Chipper Tips: Apple Snack Recipe and 3 Recycle Crafts
October is here! Autumn is underway and it’s time to enjoy one of the most popular fall fruits: Apples! One of the world’s healthiest foods, apples have numerous health benefits and are sweet enough to get kids to eat them without hesitation. Still have difficultly convincing your little one(s) to munch on this healthy snack? Try this tasty yet nutritious snack after school or even for dessert:
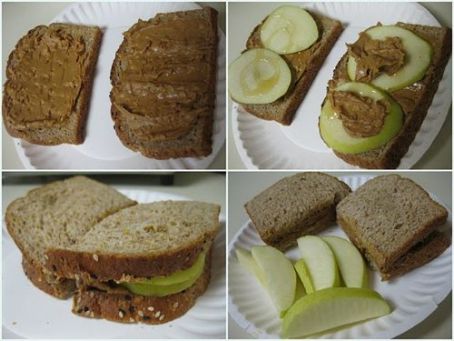
Peanut Butter Honey Apples
 A classic recipe with some oomph:
- Cut apples into bite sized wedges and remove seeds and core with knife or apple-corer.
- Then dip in peanut butter or spread peanut butter onto apples with knife. Whichever you prefer!
- Finish by drizzling on some honey with a spoon.
- Enjoy!
There are many variations to this yummy classic snack. Make it an apple sandwich by cutting your apple into flat round slices and put peanut butter and honey in-between two slices. Or add the three ingredients between two slices of bread to make it a real sandwich! Another idea is to add cinnamon to make it extra special this holiday season. Have other ideas? Share them with Chipper!

Learn more about which apples to use for what in Your Autumn Guide To Apples [Infographic]!

Recycled Toilet Paper Roll Apple Craft

This craft is awesome because it requires almost no supplies, and it’s safe to assume most of us have paper rolls around the house. Oh and it’s so cute! These could also be used for cute apple napkin rings, a useful craft perfect for the Holiday Season!
- Gather your materials. You will need a toilet paper roll, red and green paint, a sponge paint brush ( any brush or even fingers will work but sponges work best!), scissors and glue.

- Start by cutting your roll into rings, you can make think or thin.
- Cut 1 or 2 into strips ( these will be made into the leaves).

- Paint the rings red, inside and out. Let dry.

- Paint the strips green. Let dry.

- When the paint is dry cut the strips into leaf shapes.

- Bend the bottom.

- Add glue

- Stick it on the red ring! Use as decorations, fun toys, or napkin holders!


Recycled Plastic Bottle Apple Craft

Chipper loves to reduce, reuse and recycle! The bottoms of plastic drink bottles come together to form what looks remarkably like an apple shape. By varying the size of the bottle bottoms, you can make bigger or smaller kids apple crafts to use as boxes for all sorts of things.
HOW TO:
- Cut off the bottoms of two drink bottles. (You will have to do this for the children, as it requires sharp scissors or a knife.)
- Have children fill one of the bottle bottoms with whatever they like – red colored treats, little notes, small toys, or anything else they can think of. They can also crumple up some red cloth, red napkins, red tissue paper or red-colored recycle paper inside the apple crafts for kids, which makes them a bit more decorative.
- Punch two holes in each bottle bottom. Now have your child close the “apple” by sliding the second bottle bottom on top of the first. He or she can add a stem and leaves made of colored cardboard, craft foam and/or felt for decoration.
- By threading ribbon through the holes and tying a bow, you can secure the lid onto each of the kids apple crafts.
- Finally, have your child add a note with the recipient’s name or a sweet message.
This “apple for the teacher” back to school craft for kids is perfect for children to present to their teachers during the first week of school – or any time, really. Apples are also one of the symbols of the Jewish New Year, so this also makes a great Rosh Hashana craft for any Jewish friends or teachers in your kids’ lives!
Recycled Paper Plate Apple Craft
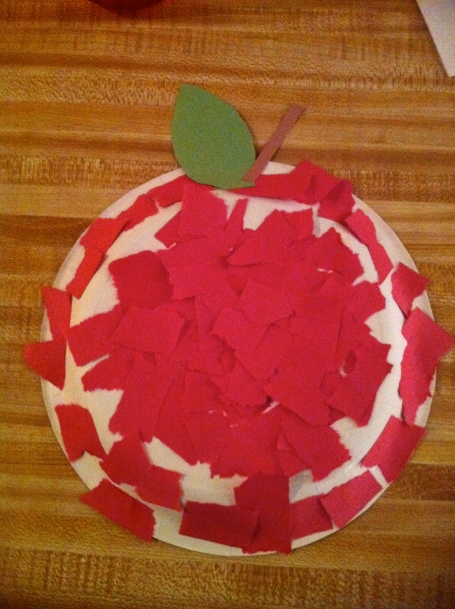
Re-imagine and old paper plate using torn red paper, tissue or napkins and gluing them on! Then just cut out a stem and a leaf and hang up on the fridge. This is a very simple and easy craft for your little one’s to try and they make cute, home-made decorations for Fall, the Holidays, or a classroom!
Chipper Snacks: Nutty Banana Bread Recipe
Baking with kids is fun AND educational! Teach them healthy habits while they practice their mathematical, reading and motor skills.
Make it mathematical! Baking involves simple measurements that can help your little one learn about fractions and proportions. Whether you double the recipe or just add two 1/2 teaspoons to make a whole, add a dash of math into the experience. Learning hands-on helps kids really understand a concept. Depending on your little one(s) age, you can even get into the chemistry and ask why you have to add baking soda to the recipe.
Make it collaborative! Invite a friend over or have siblings work together as you follow the recipe. Taking turns is an important lesson for kids to learn and baking is a great way to put it into practice. Have one child add one ingredient and the other add the next. Have them figure out which measuring cup to use and help each other mix it all up! Team work is a valuable lesson at any age.
Don’t forget to teach them Chipper’s Tip on Healthy Eating Habits:
“Healthy before sweet, can’t be beat!”
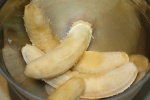


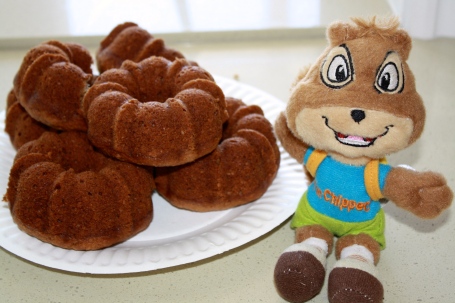
BANANA BREAD
INGREDIENTS
- 1/2 cup (1 stick) butter, at room temperature, plus more for pan
- 1 cup granulated sugar
- 2 large eggs
- 1 1/2 cups unbleached flour
- 1 teaspoon baking soda
- 1 teaspoon salt
- 1 cup mashed very ripe bananas (4-5)
- 1/2 cup sour cream
- 1 teaspoon vanilla
- 1/2 cup chopped walnuts or pecans
DIRECTIONS
- Pre-heat oven to 350 degrees. Butter or non-stick spray a 9-by-5-by-3-inch loaf pan or miniature Bundt pan for shorter bake time; set aside. In an electric mixer fitted with the paddle attachment, cream butter and sugar until light and fluffy. Add eggs, and beat to incorporate.
- In a medium bowl, whisk together flour, baking soda, and salt. Add to the butter mixture, and mix until just combined. Add bananas, sour cream, and vanilla; mix to combine. Stir in nuts, and pour into prepared pan.
- Bake until a cake tester inserted into the center of the cake comes out clean, about 1 hour 10 minutes. Let rest in pan for 10 minutes, then turn out onto a rack to cool.
- Enjoy! 🙂
What’s your favorite Fall Recipe? Share it or other tips with Chipper to receive a FREE gift! Enter our fall photo contest by posting a picture of how you’re chipper for fall to Twitter, Instagram, Pinterest or Facebook and hash tag with #Chipper4Fall!
Chipper Snacks: Cranberry Apple Crisp
“Let us be up and doing with a heart for any fate.”
~ Henry Wadoworth Longfellow
A whiff of woodsmoke on the wind, the first chill in the air, the woods just edged in gold. Without looking at the calendar we know we’ve turned the page and it’s Fall! Time to put the “SWEET” in Home Sweet Home and make a tasty snack for you and the kids to enjoy on a lovely Fall day after school or dinner.
Cranberry Apple Crisp
375˚ ~ Serves 6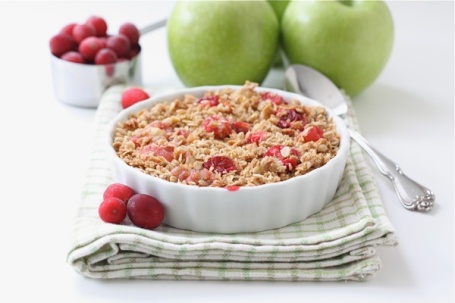
- 4 large Green Apples, peeled and sliced 1/2″
- 1 cup fresh Cranberries
- 3/4 cup Brown Sugar, firmly packed
- 1/2 cup Flour
- 1/2 cup Oats
- 3/4 tsp. Cinnamon
- 3/4 tsp. Nutmeg
- 1/3 cup softened Butter
Preheat oven to 375˚ then butter a square baking pan. Place apple slices and cranberries in the pan. Mix remaining ingredients well and sprinkle over fruit. Bake for 30 min. Serve hot with ice cream or cold with whipped cream.
There’s nothing like running home from school on a crisp clear day, crunching as many leaves as possible with your shoes on the way, coming in the door, breathless and pink cheeked, slamming the books down and finding mom in the kitchen pulling a pan of apple crisp from the oven… Smells like, looks like, and tastes like love to me!
Share your favorite after-school snack recipe with Chipper!
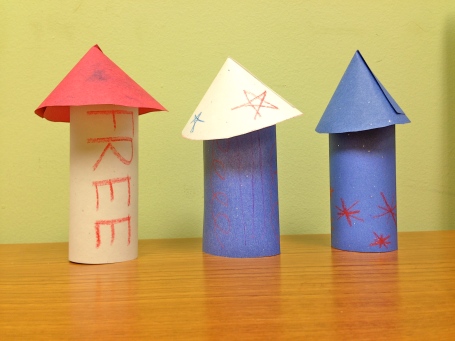
Chipper Recycle Craft and Snack: Fourth of July Edition
Happy Almost Independence Day! Also known as July Fourth, this holiday celebrates the thirteen colonies’ legal separation from Great Britain in 1776. The story is that on July 2, 1776, the Second Continental Congress voted to approve the Lee Resolution, a resolution to be independent from Great Britain. After Congress finished voting for independence, they turned their attention to the famous Declaration for Independence, which was essentially a document that explained why the Thirteen Colonies were separating from Great Britain. On July 4, 1776, the Declaration fror Independence was approved by Congress.
In the spirit of Independence Day, here’s a fun and simple craft to make with your little one! You only need a couple of things:
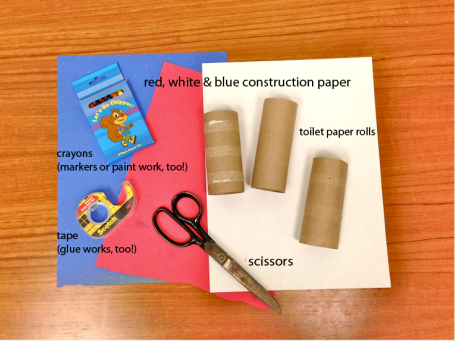
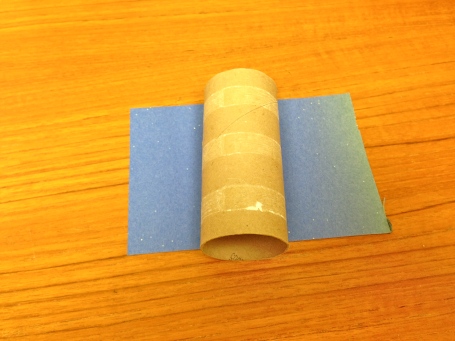
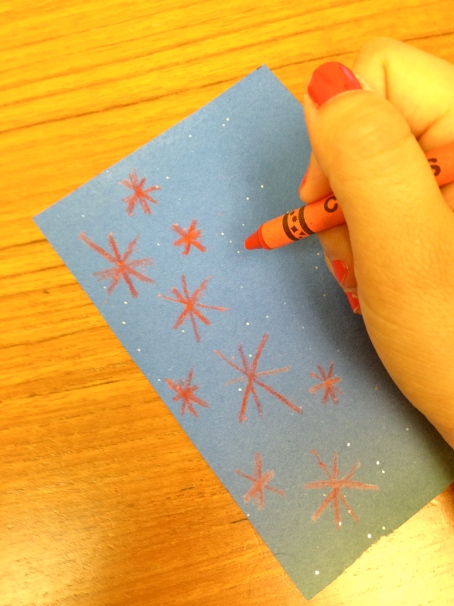
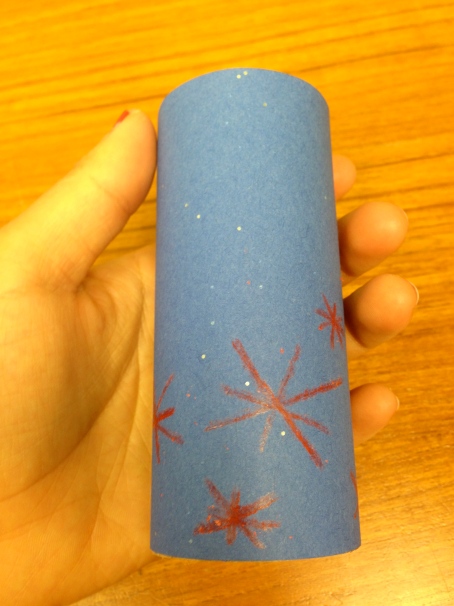
First, cut a rectangle out of construction paper that will fit the exterior of the toilet paper roll.
Using crayon, marker, or paint, decorate the rectangle with Fourth of July themed symbols, colors, and words!
Then, using tape or glue (Chipper used double-sided tape), cover the toilet paper with construction paper.
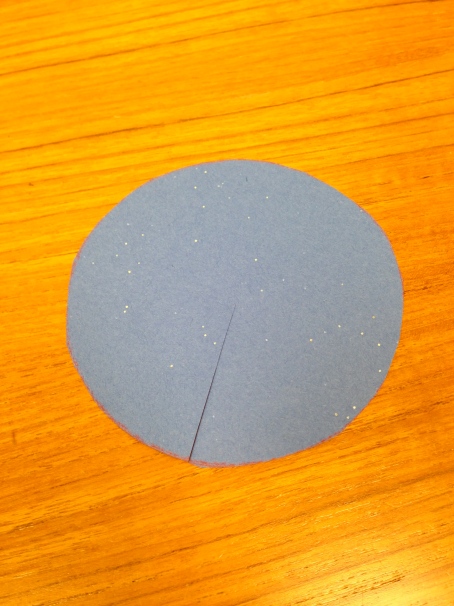
Next, cut a circle out of construction paper and make a slit like so. Form the circle into a cone and tape or glue shut.
Fit on top of paper towel roll and glue or tape in place.
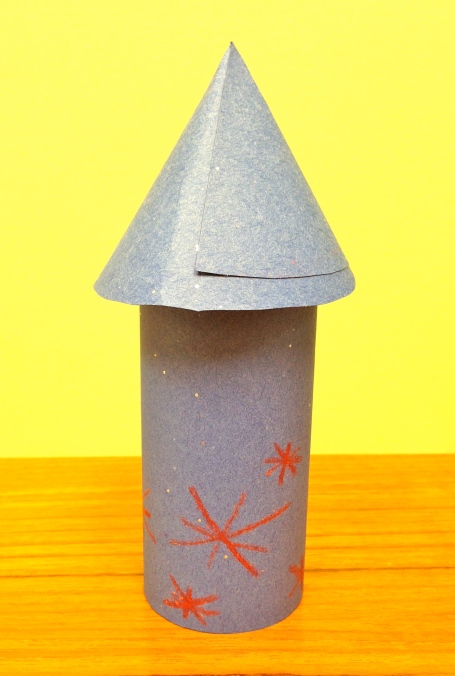
And there you go–cute Fourth of July firecrackers to put on display in your child’s room or around the house.
For a fun and healthy Fourth of July themed snack, here are some fruit skewers that form the American flag:
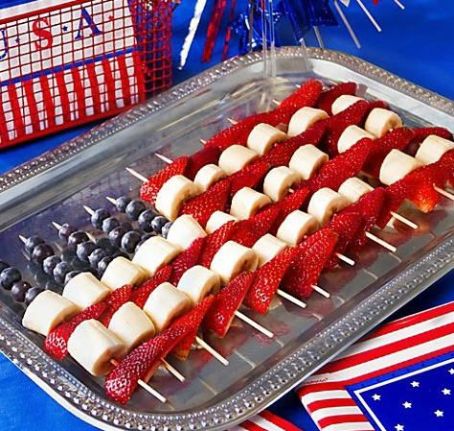
Make these blueberry, strawberry and banana skewers for Fourth of July and they’ll sure be a hit! Let’s Go Chipper for Fourth of July!

